
Create a Pretty Pumpkin (with Succulents and More!) in Under 10 Minutes Flat
Affiliate Disclosure: This page may contain affiliate links, meaning that I receive commissions for purchases made through those links, at no cost to you.
I have been asked by several people since having published my “Floral Design in a Pumpkin” video and its accompanying PDF tutorial about whether I would be willing to give a quick tutorial on how to use succulents to decorate pumpkins. The answer was “absolutely!” And I just so happened to have 10 minutes tonight. And I am now happy to I bring you….Punchy Pumpkins with Succulents and More!
©BetsyGibsonDesign White Pumpkin decorated with succulents and dried elements, including my favorite fall 2019 element….Dried Oregano!
It’s easier than you might think to turn a white pumpkin into a vehicle for flowers (as we know from the tutorial), but it’s even EASIER to create a succulent and dried element design. Why? Because there will be no cutting of the pumpkin! Instead, we will be gluing our elements directly onto the top of the pumpkin. Here we go….

Photo ©Betsy Gibson Design. The only things I’ll need for my white pumpkin design.
What You’ll Need (Not Much!)
As you can see from the photo above, you don’t need a whole lot of anything to decorate a white pumpkin (or any pumpkin…but white has been my seasonal mainstay…). I was able to scrounge up the following from my studio:
Reindeer Moss: SO good for so many things. You can never have enough of this stuff. Love it.
White Tallow: It’s the Virginia girl in me. But this is “faux”, so don’t tell anyone. (I generally don’t even buy “faux”—or let’s just call it what it is…”fake”…elements, but I have over the past few months just so that I have things to work with if the mood should strike and the flower market is closed.
Dried Globe Thistle: Yep. I took this out of an arrangement from earlier in the fall. I should put it on my site, but so far, it has landed only on Instagram…..(note to self…..beef up the pumpkin design section of the site!)
Millet: This was also pilfered from one of my early fall arrangements. Lots of pilfering going on, it seems. (There will be more….)
Dried Oregano: I have so much of this because I fell in love with it back in September. However, because it was easy, I just stole it out of the same arrangement from which I stole the millet. It’s ok. The cabbage in that design had died, so it was ready to be taken apart…
The fakest of the fake….several different varieties of succulent. Now, while I would normally use fresh succulents, I will tell you that I didn’t want to “waste” my “good stuff” on this tutorial. But you’ll get the idea, even if you don’t see my pretty (and very real) succulents.
Also fake: A few Dusty Miller sprigs. These look a little worse for the wear. Not sure what they were used for (if anything, ever), but they did nicely for this project.
Glue gun (not shown). I don’t use glue guns often because I do not view myself as engaging in “crafts”, but I’ve learned the hard way that one should use (when choosing to use one of these “crafter staples”) a low temp/low heat glue gun. And also….make sure you buy way more glue than you think you’ll need. You’ll thank me.
And, of course, a pumpkin…I’ve used a Snowball, because they are my favorites, but you can use any size!
How To…(OK, Set Your Timer for 10 Minutes!)

©Betsy Gibson Design, Moss On White Pumpkin.
STEP ONE: See Photo Above
Place your moss around the top of your pumpkin and then, once you have decided upon how you’d like to place it, grab that glue gun and get to work. I squeeze the glue directly onto the pumpkin and then take a clump of moss (after thinning it) and apply it to the top of the pumpkin on top of the glue. Be careful doing this, as the glue is hot, and it DOES hurt if you burn yourself. You could either wear gloves or use some sort of implement to push the moss down onto the glue.
STEP TWO: See Photo Below
Take your elements and just sort of play with where you might want them to go on the top of your pumpkin. Think of your pumpkin as a canvas and try out different layouts. Once you decide where you want them to go, put some glue down and get those elements placed! Again, be careful, because you don’t want to get burned.

Photo ©Betsy Gibson Design. Placing Millet on top of my Snowball Pumpkin.
STEP THREE: See Photo Below
Because you weren’t sure upon starting the project the size you’d need your pieces to be, you’ll now have to cut or trim them as you move along. Here, I am adding cut Globe Thistle and am cutting the Succulents down to a manageable size.

©BetsyGibsonDesign. Working on a White Pumpkin/Succulent design.
STEP FOUR:
Now just have fun!
Place your elements and glue them down in any way that you’d like. You’ll see. You’ll be finished with this in 10 minutes or less. And you’ll love your little pumpkin guy!
But most importantly, once you’ve created your first pumpkin design with moss and other dried (or “faux”/fake!) elements, you’ll also have the confidence to know that you now have something that you could use for your Thanksgiving table. (Hint: Group several of these little pumpkins, spread out on top of something like seeded eucalyptus or silver dollar eucalyptus, maybe with some ruscus thrown in for a darker green and a different shape, as the base for your tablescape. Then add something simple like dried leaves, fruit (think apples, pears) and/or nuts to complete the look and tie the pumpkins together.

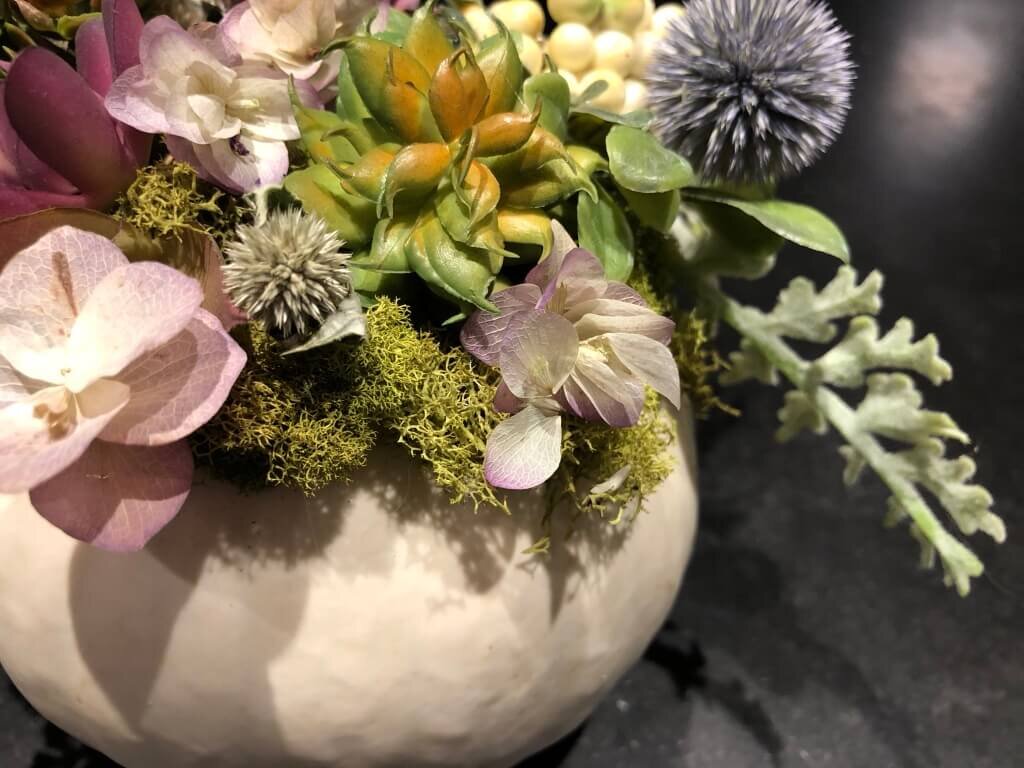
©Betsy Gibson Design. Final Pumpkin Design 2019.
I hope you’ve enjoyed this quick and easy little tutorial. I’d love to see photos of your creations!! Please send them along, and I’ll feature them on the blog!